

Recently, I was performing prerequisite checks on an Exadata in preparation for the normal quarterly full stack patch and in doing so came across a section of the Exacheck with the heading “Database should not be in DST upgrade state“. Upon investigation I found that to be true:
select name, value$ from sys.props$ where name like '%DST%';

NAME			       VALUE$
------------------------------ ------------------------------
DST_UPGRADE_STATE	       UPGRADE
DST_PRIMARY_TT_VERSION	       32
DST_SECONDARY_TT_VERSION       18
Based on this, I took this as an action item to correct during the patching cycle and continued the normal checks and a quick look through recent AWRs. Is was then that I found something interesting in the “Exadata” section of the report:
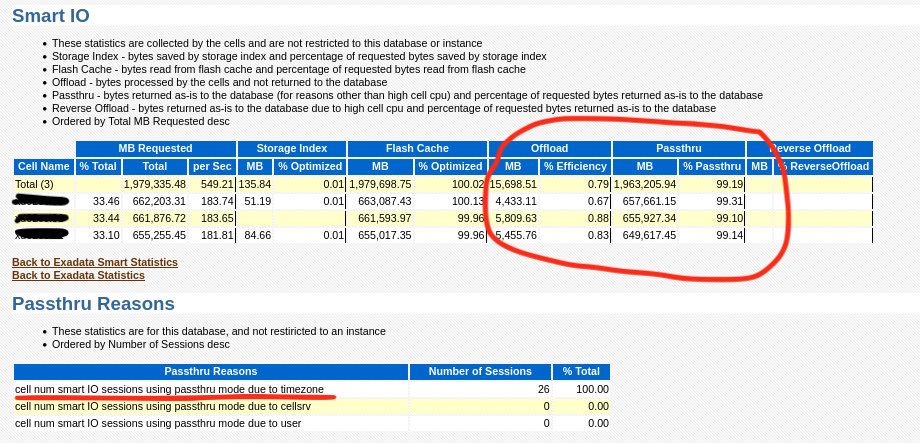
As you can see, nothing is being offloaded and in the “Passthru Reasons” section “timezone” is the culprit. I then went to look at a query or two and sure enough, that confirms it:

So sure enough a stuck timezone file upgrade can cause the entire reason you bought an Exadata not to work! The date it quit working also coincides with when an upgrade to 19c occurred. Another quick sanity check of MOS also revealed the following note:
Exadata: Database Performance Degrades when Database is in Timezone Upgrade Mode (Doc ID 1583297.1)
So now, how to fix it? The note says to try the following commands, but unfortunately that did not work:
alter session set events '30090 trace name context forever, level 32';
exec dbms_dst.unload_secondary;
BEGIN dbms_dst.unload_secondary; END;

*
ERROR at line 1:
ORA-56938: no secondary time zone data file being loaded by on-demand or a datapump job
ORA-06512: at "SYS.DBMS_DST", line 1969
ORA-06512: at "SYS.DBMS_SYS_ERROR", line 79
ORA-06512: at "SYS.DBMS_DST", line 1906
ORA-06512: at line 1
So at this point we could either try the timezone upgrade again, or try to force the timezone upgrade window to close. The following MOS note discusses the timezone upgrade process:
Updating the RDBMS DST version in 12c Release 1 (12.1.0.1 ) and above using DBMS_DST (Doc ID 1509653.1)
Due to time, I decided to try forcing the upgrade window to close (as all other indicators showed that the upgrade was successful on all other objects) and immediately we found the reason why the upgrade failed in the first place…. An invalid and UNUSED version of APEX!!!
alter session set "_with_subquery"=materialize;
alter session set "_simple_view_merging"=TRUE;
set serveroutput on
VAR numfail number
BEGIN
DBMS_DST.UPGRADE_DATABASE(:numfail,
parallel => TRUE,
log_errors => TRUE,
log_errors_table => 'SYS.DST$ERROR_TABLE',
log_triggers_table => 'SYS.DST$TRIGGER_TABLE',
error_on_overlap_time => FALSE,
error_on_nonexisting_time => FALSE);
DBMS_OUTPUT.PUT_LINE('Failures:'|| :numfail);
END;
/
VAR fail number
BEGIN
DBMS_DST.END_UPGRADE(:fail);
DBMS_OUTPUT.PUT_LINE('Failures:'|| :fail);
END;
/
SELECT PROPERTY_NAME, SUBSTR(property_value, 1, 30) value
FROM DATABASE_PROPERTIES
WHERE PROPERTY_NAME LIKE 'DST_%'
ORDER BY PROPERTY_NAME;
Table list: "APEX_040200"."WWV_FLOW_FEEDBACK"
BEGIN
*
ERROR at line 1:
ORA-04098: trigger 'APEX_040200.WWV_FLOW_FEEDBACK_T1' is invalid and failed re-validation
ORA-06512: at "SYS.DBMS_DST", line 1131
ORA-06512: at "SYS.DBMS_DST", line 611
ORA-06512: at "SYS.DBMS_DST", line 209
ORA-06512: at "SYS.DBMS_DST", line 858
ORA-06512: at "SYS.DBMS_DST", line 596
ORA-06512: at "SYS.DBMS_DST", line 1123
ORA-06512: at line 2
After following the normal process to remove those old versions of APEX (I am a believer in removing it period if you aren’t using it), I was then able to close the upgrade window for timezone with no errors:
select name, value$ from sys.props$ where name like '%DST%';

NAME			       VALUE$
------------------------------ ------------------------------
DST_UPGRADE_STATE	       UPGRADE
DST_PRIMARY_TT_VERSION	       32
DST_SECONDARY_TT_VERSION       18

alter session set "_with_subquery"=materialize;

Session altered.

alter session set "_simple_view_merging"=TRUE;

Session altered.

set serveroutput on
VAR numfail number
BEGIN
DBMS_DST.UPGRADE_DATABASE(:numfail,
parallel => TRUE,
log_errors => TRUE,
log_errors_table => 'SYS.DST$ERROR_TABLE',
log_triggers_table => 'SYS.DST$TRIGGER_TABLE',
error_on_overlap_time => FALSE,
error_on_nonexisting_time => FALSE);
DBMS_OUTPUT.PUT_LINE('Failures:'|| :numfail);
END;
/
Table list: "APEX_200200"."WWV_FLOW_WORKSHEET_NOTIFY"
Number of failures: 0
Table list: "APEX_200200"."WWV_FLOW_WEB_SRC_MODULES"
Number of failures: 0
Table list: "APEX_200200"."WWV_FLOW_ACTIVITY_LOG2$"
Number of failures: 0
Table list: "APEX_200200"."WWV_FLOW_DEBUG_MESSAGES"
Number of failures: 0
Table list: "APEX_200200"."WWV_FLOW_DEBUG_MESSAGES2"
Number of failures: 0
Table list: "APEX_200200"."WWV_FLOW_WEBSOURCE_SYNC_LOG1$"
Number of failures: 0
Table list: "APEX_200200"."WWV_FLOW_WEBSOURCE_SYNC_LOG2$"
Number of failures: 0
Table list: "APEX_200200"."WWV_FLOW_AUTOMATION_LOG1$"
Number of failures: 0
Table list: "APEX_200200"."WWV_FLOW_AUTOMATION_LOG2$"
Number of failures: 0
Table list: "APEX_200200"."WWV_FLOW_AUTOMATION_MSG_LOG1$"
Number of failures: 0
Table list: "APEX_200200"."WWV_FLOW_AUTOMATION_MSG_LOG2$"
Number of failures: 0
Table list: "APEX_200200"."WWV_FLOW_FEEDBACK"
Number of failures: 0
Table list: "APEX_200200"."WWV_FLOW_FEEDBACK_FOLLOWUP"
Number of failures: 0
Table list: "APEX_200200"."WWV_FLOW_PKG_APP_INSTALL_LOG"
Number of failures: 0
Table list: "APEX_200200"."WWV_FLOW_ACTIVITY_LOG1$"
Number of failures: 0
Table list: "APEX_200200"."APEX$ARCHIVE_HEADER"
Number of failures: 0
Table list: "APEX_200200"."APEX$ARCHIVE_CONTENTS"
Number of failures: 0
Table list: "APEX_200200"."APEX$ARCHIVE_HISTORY"
Number of failures: 0
Table list: "APEX_200200"."APEX$ARCHIVE_LOG"
Number of failures: 0
Table list: "APEX_200200"."APEX$ARCHIVE_PREF"
Number of failures: 0
Table list: "APEX_200200"."WWV_FLOW_AUTOMATIONS"
Number of failures: 0
Failures:0

PL/SQL procedure successfully completed.

VAR fail number
BEGIN
DBMS_DST.END_UPGRADE(:fail);
DBMS_OUTPUT.PUT_LINE('Failures:'|| :fail);
END;
/
An upgrade window has been successfully ended.
Failures:0

PL/SQL procedure successfully completed.

select name, value$ from sys.props$ where name like '%DST%';

NAME			       VALUE$
------------------------------ ------------------------------
DST_UPGRADE_STATE	       NONE
DST_PRIMARY_TT_VERSION	       32
DST_SECONDARY_TT_VERSION       0
Now after changing this, you can now see that the “Passthru Reasons” section is no longer populated and all cell offloads are occurring again:
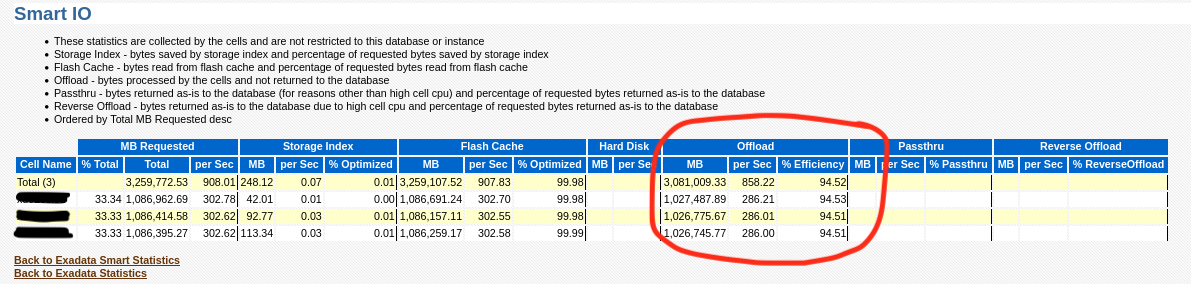
Confirming via looking at AWR also shows the query now getting proper offload:

So the moral of the story is that when performing an upgrade, take extra care to check if there are invalid objects along the way and also don’t proceed unless it is properly resolved! Also, consider removing features of the database if you are not using them. It will lessen the chance for there being outliers causing problems and your upgrade will actually complete faster!
Enjoy!
